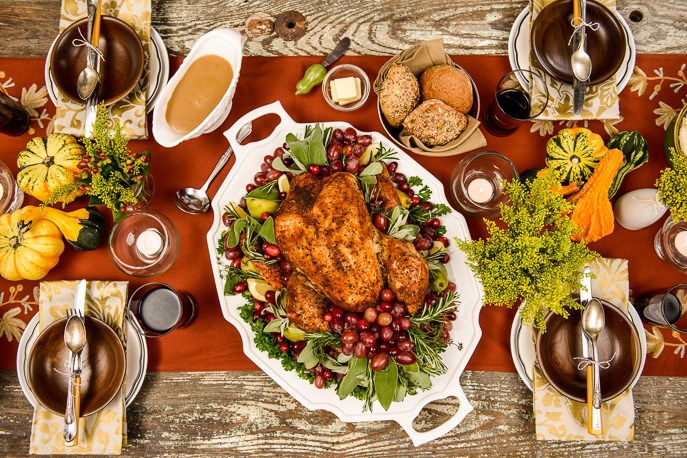
We at Hamilton Beach have made more than a few turkeys in our time, and we know turkey is on everyone’s mind come November. We’re here to help with a few tips, tricks and suggestions to make sure your Thanksgiving centerpiece turns out perfectly.
1. Choose the right size turkey.
The general rule for turkey is to buy one and a half pounds of turkey per person to allow for seconds and leftovers. Also, take into consideration the size of your oven or roaster oven. If you feel like an extra-large turkey will be too arduous or you can’t find a large enough bird, you can cook two smaller turkeys and avoid the inevitable fight for the drumsticks.
2. Defrost the turkey.
If you are buying a fresh turkey, you don’t need to worry about this step. If you are buying a frozen turkey, you’ll need to plan out your defrosting time well in advance. It is important to keep the turkey cold while it’s thawing; the refrigerator method is easiest. Place the turkey on a rimmed tray in the fridge in its original wrapping. For a whole turkey, allow 24 hours for every 4-5 pounds. For a turkey breast, allow 1-2 days.
3. To stuff or not to stuff…that is the question.
If you are stuffing the bird, use ½ cup stuffing per pound of turkey for turkeys under 10 pounds and ¾ cup per pound for turkeys more than 10 pounds. The ingredients can be prepared ahead of time, but don’t mix the wet and dry ingredients until just before filling the turkey cavity. Add the stuffing only when you are about to put your turkey in the oven, and fill it loosely because the stuffing will expand as it cooks. You can place the stuffing in cheesecloth before placing it in the cavity to make removing it a cinch. Add 30 extra minutes to the roasting time, and use a thermometer to ensure the center of the stuffing reaches at least 165 degrees F. Remove the stuffing before carving the turkey.
4. Cook the turkey.
If using a regular oven to cook a whole turkey, estimate an hour of cooking time for every 4 pounds of turkey. A 12-14 pound turkey would take about 3-4 hours and a 20-24 pound turkey would take about 5-6 hours.
If using a roaster oven, your cooking time will be about half the time of a regular oven. The combination of the heating element being close to the turkey and the moist heat cooks food quickly. The 22 quart roaster ovens are designed to fit a turkey up to 24 pounds, and 18 quart roaster ovens will hold a turkey up to 18 pounds. Still, use a meat thermometer to be sure it’s thoroughly cooked.
5. Test for doneness.
The best guide to turkey doneness is a meat thermometer. Remove the turkey from the oven and insert the thermometer into the breast, avoiding bone. It should read at least 165 degrees F. Stuffing inside a bird should also reach 165 degrees F.
Follow Health Canada recommendation for safe cooking temperatures. A chart of safe minimum cooking temperatures can be found here. For more information on food safety, visit Health Canada’s site.
6. Let it rest.
When your turkey is done, remove the turkey from the oven and tent it with foil. Allow it to rest for 20-30 minutes while you heat up side dishes and make the gravy. The rest allows juices to redistribute so your turkey will be moist and delicious.
7. Save the giblets, trimmings and carcass.
Get your money’s worth by using the extras from your turkey. Save the giblets and trimmings (minus the liver) and brown them on the stove. Drain the fat and simmer the extras with veggies and herbs to make a delicious stock for your gravy. Save the carcass and make a big batch of stock in a large pot with the veggies and herbs you didn’t use up. Let it simmer for two hours and then strain the stock and discard the solids. Freeze it in pre-measured 1-cup bags so you can grab some when you cook a recipe calling for chicken stock.
TAGS: stuffing, Thanksgiving, Tips, turkey
CATEGORIES: From the Test Kitchen, thanksgiving, Uncategorized