Tag Archives: chicken

Nothing says convenience like instant noodles. Microwaving a cup of noodles gives you the feel and satisfaction of takeout without the cost. But what if we told you that you could make your own instant noodle soup at home? This homemade version made with spiralized veggies will make you rethink the next time you reach for a sodium-packed, microwaveable cup from the back of your pantry.

Spiralizer Instant Noodle Soup Jars

These take-along jars don’t have “noodles” at all. Rather spiralized zucchini and carrots pose as ramen or rice noodles. Once the zucchini and carrots are spiralized using the 4-in-1 Electric Spiralizer, layer the spirals, shredded chicken, bok choy and green onion in mason jars.

Spiralizer Instant Noodle Soup Jars

In a microwave-safe bowl, mix chicken broth, honey, salt, pepper, ground ginger, and crushed red pepper. Microwave the mixture on high for about two minutes, until it comes to a boil. Pour the broth over the ingredients in the mason jar and serve immediately. It’s just that easy.

Spiralizer Instant Noodle Soup Jars

What’s great about these instant “noodle” cups is that you can easily prep them as a grab-and-go lunch for the week. If you want to prepare these cups ahead of time, skip the boiling of the broth and pour the cold liquid into mason jars. When you’re heading to work or when the kids head to school, the mason jars will be ready and waiting in the refrigerator. When you’re ready to eat, pour the mixture into a bowl and microwave for about 2 to 3 minutes.

Spiralizer Instant Noodle Soup Jars

Not only are these instant noodle cups a great back-to-school or desk lunch idea, they are easily customizable. If you wanted to make a vegetarian version, nix the shredded chicken and use vegetable broth instead. Want it a little spicer? Up the ground ginger and red pepper flakes and add sriracha on top.

Whether you are eating these instant noodle cups day-of or a few days later, you won’t miss the 99 cent version you’re used to.

Spiralizer Instant Noodle Soup Jars

Instant Noodle Soup with Spiralized Veggies
Votes: 0
Rating: 0
You:
Rate this recipe!
Print Recipe
Instant Noodle Soup with Spiralized Veggies
Votes: 0
Rating: 0
You:
Rate this recipe!
Print Recipe
Ingredients
Servings:
Units:
Instructions
  1. Using a spiralizer, make spirals of zucchini and carrots.
  2. Layer zucchini and carrot spirals, chicken, bok choy and green onions among four (12-ounce) mason jars.
  3. In a medium microwave-safe bowl, stir chicken broth, honey, soy sauce, salt, black pepper, ground ginger and crushed red pepper. Microwave on HIGH until mixture comes to a boil, about 2 minutes. Divide chicken broth mixture evenly among jars.
  4. Serve immediately.
Share this Recipe


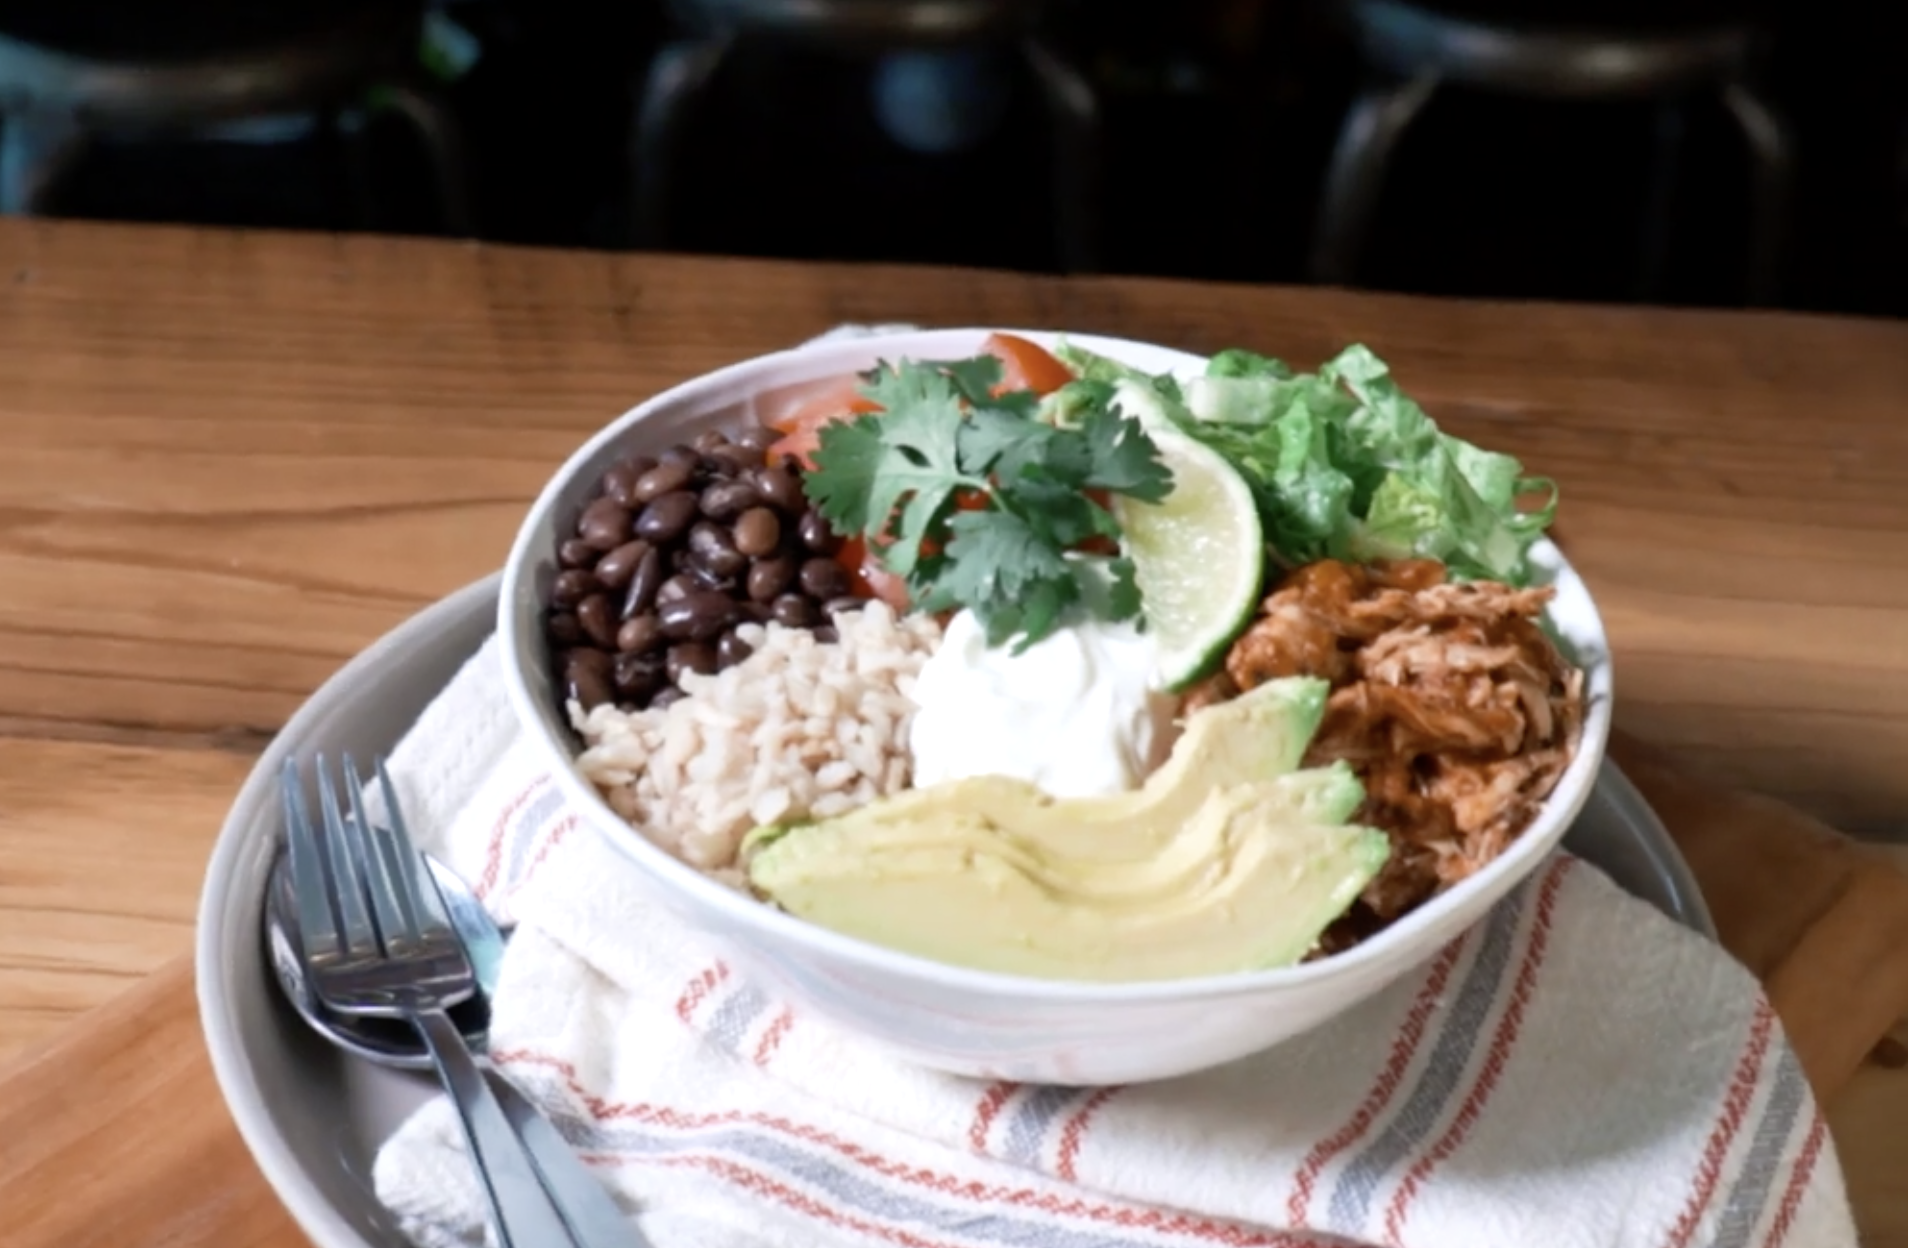
There’s no better meal to offer a family with different tastes (while agreeing on one protein). Our Make it with Hamilton Beach host, nutritionist Miranda Malisani, created this delicious and easy recipe for Chicken Burrito Bowls.

Burrito bowls are a fun way to have kids (and adults) choose their own ingredients especially after a long day at work or school. This dinner can be prepped easily and cooked in advance for an easy dinner. It’s also great leftovers too – the chicken is moist and perfect for next day sandwiches.


Watch step-by-step as Miranda demonstrates how to make it with Hamilton Beach in your kitchen by watching the video and check out the recipe details below.


Make it with Hamilton Beach: Chicken Burrito Bowl
Votes: 0
Rating: 0
You:
Rate this recipe!
Print Recipe
Servings
8
Servings
8
Make it with Hamilton Beach: Chicken Burrito Bowl
Votes: 0
Rating: 0
You:
Rate this recipe!
Print Recipe
Servings
8
Servings
8
Instructions
  1. Mince garlic and set aside for 10 minutes to bring out properties.
  2. Dice peppers, tomatoes and green onions.
  3. Mix spices (cumin, oregano, onion powder, chili powder, sea salt) in a ramekin.
  4. Add chicken to crock and sprinkle seasoning over chicken.
  5. Add in garlic, peppers, tomatoes and green onions.
  6. Cover all ingredients in tomato sauce.
  7. Cook in slow cooker for 2.5 to 3 hours at high.
  8. Chicken is cooked when you can pull meat apart easily.
  9. Add chicken to bowls of quinoa or brown rice and top with avocado, black beans, cilantro or other favourite toppings.
Recipe Notes

Recipe by Miranda Malisani

Miranda Malisani, RNCP is a Toronto based Nutritionist who is recognized nationally for her expertise in holistic nutrition. Her down-to-earth attitude and ability to cater her services to an individual’s needs has made her a leader in the field. Miranda specializes in creating customized nutrition solutions.

Share this Recipe


If you haven’t tried making Peruvian chicken (pollo a la brasa) at home, we’ve got the ultimate guide for putting a perfectly seasoned rotisserie-roasted bird on the table.

Whether you’ve tried it at a Peruvian restaurant with fried plantains and rice or picked it up pre-made at the grocery store, Peruvian chicken is making a name for itself. While Peruvian restaurants might do it best, this recipe from our Test Kitchen is pretty close to the real deal. The spice-heavy rub paired with the tangy, refreshing green sauce makes for a flavour combination that’s hard to beat.

Peruvian Chicken - Making the Rub

To make the slightly spicy and smoky rub for your Peruvian chicken (it’s really the star of the show), mix garlic, soy sauce, sriracha, lime juice, olive oil, cumin, paprika, mustard, chili powder, black pepper, and oregano. Rub the mixture over all sides of your trussed chicken chicken and in the cavity. Need help trussing your bird? Watch this helpful video from the Test Kitchen. Cover and refrigerate overnight so the flavours have time to marry and the bird can marinate.

Rotisserie Peruvian Chicken

Before cooking the chicken, secure it on a rotisserie skewer and insert it into your Hamilton Beach® countertop oven. We like this model for it’s rotisserie and convection functions. Roast for 1 to 1 ½  hours or the meat thermometer reads 165 degrees.

Rotisserie Peruvian Chicken

While the Peruvian chicken is roasting, make the green sauce for topping or dipping. Using a food processor, blender or food chopper (we love the glass bowl food chopper for this), add cilantro, green onions, jalapenos, garlic, lime juice, and olive oil. Pulse until the mixture is finely chopped, and then add mayonnaise. Pulse until the mixture is combined and you have a beautiful (and immensely flavorful) bright green sauce.

Making Peruvian Green Sauce in the Hamilton Beach Glass Bowl Chopper

Peruvian Chicken Green Sauce

This sauce perfectly complements the roasted chicken. It’s tangy and refreshing, and adds a pop of color to your plate.

Peruvian Chicken

Serve this rotisserie Peruvian chicken if you’re craving an out of the ordinary weeknight meal or want to upgrade your Taco Tuesday mains. If you’re a chicken wing fan, this rub makes a great tasting wing, too. Toss them in the spice rub after frying and use the green sauce for dipping while you’re watching your favourite team play on game day.


Peruvian Chicken on the Rotisserie with Homemade Green Sauce
Votes: 0
Rating: 0
You:
Rate this recipe!
Print Recipe
Servings
4
Servings
4
Peruvian Chicken on the Rotisserie with Homemade Green Sauce
Votes: 0
Rating: 0
You:
Rate this recipe!
Print Recipe
Servings
4
Servings
4
Ingredients
Rub
Servings:
Units:
Instructions
  1. Truss chicken.
  2. In a medium bowl, stir together garlic, soy sauce, sriracha, lime juice, oil, cumin, paprika, mustard, chili powder, salt, black pepper and oregano.
  3. Rub garlic mixture over all sides of chicken and inside the cavity. Cover and refrigerate overnight.
  4. Secure chicken on rotisserie skewer. Insert into oven.
  5. Set oven to rotisserie. Roast 1 to 1 1/2 hours or until meat thermometer reads 165°F.
  6. Meanwhile, in a personal blender or small food processor add cilantro, green onion, jalapenos, garlic, lime juice and olive oil. Cover and pulse until mixture is finely chopped.
  7. Add mayonnaise and pulse until mixture is well blended. Cover and refrigerate until ready to serve.
  8. Remove chicken to a cutting board and carve.
  9. Serve chicken pieces with green sauce.
Share this Recipe


There’s no wrong way to eat zucchini. Whether you’re using your Hamilton Beach® electric spiralizer to make long zoodles, baking it into zucchini bread, or  sautéing slices for a simple summer side dish, there are plenty of recipes that incorporate this seasonal veggie.

Mexican Zucchini Boats

One of my favourite ways to enjoy this summer squash  is making zucchini boats. Zucchini boats are extremely easy to prepare and even easier to customize. Experiment with Italian, Thai, and Mexican flavor profiles to see which the family likes the most.

Mexican Zucchini Boats

Make these Mexican zucchini boats for a low-carb Taco Tuesday dinner or when you want to make sure the kids are eating their veggies.

Mexican Zucchini Boats

First, cut the zucchini in half, lengthwise. Then scoop out the center of the zucchini using a lemon baller, small ice cream scoop, or a tablespoon. Salt the zucchini halves (this is the only opportunity you’ll have to season the vegetable before it bakes) and set aside.

In a medium bowl, make your filling. Combine chopped chicken, cheese, black beans, corn, salsa, bell pepper, cilantro, jalapeno, cumin, chili powder, and salt. For a shortcut, pick up a rotisserie chicken at the grocery story or use grilled chicken leftovers from the weekend’s cookout. Want a vegetarian version? Skip the chicken altogether and add extra beans.

Mexican Zucchini Boats

Spoon ⅓ cup (you might need more depending on if your squash boat is more of a yacht than a canoe) of the mixture into the zucchini halves. The Test Kitchen wrote this recipe so that you’ll have plenty of extra filling to use throughout the week in taco cups, rice bowls, or quesadillas. Bake for 20 minutes at 400 degrees in your Hamilton Beach® Easy Reach Toaster Oven. Add a little (or a lot) of extra cheese on top and bake another 5 minutes.

Mexican Zucchini Boats

Sprinkle with some fresh cilantro and dinner is served. Serve with chips and homemade salsa for a Mexican-themed dinner any night of the week.

Mexican Zucchini Boats
Votes: 0
Rating: 0
You:
Rate this recipe!
Print Recipe
Servings
3
Servings
3
Mexican Zucchini Boats
Votes: 0
Rating: 0
You:
Rate this recipe!
Print Recipe
Servings
3
Servings
3
Recipe Notes

Test Kitchen Tip: Use the remaining chicken mixture for tacos, burrito bowls or salads.

Share this Recipe


As Victoria Day and the unofficial start of the summer approaches, we have our warm-weather menu on the brain. Whether you’re whipping up your favourite pasta salad or throwing marinated steak on the grill, there are plenty of grill-and-chill recipes to choose from. And you’ll want to add this grilled honey lime chicken to the list.

Honey Lime Grilled Chicken

One of the most popular summer recipes on the blog is mouth-watering grilled bourbon chicken. While this Hamilton Beach staff favorite will always have a place on our summer plates, the Test Kitchen wanted to develop another grilled chicken recipe that was just as delicious but with a different flavour profile. Honey lime chicken is flavour-packed and the perfect protein to serve alongside your go-to summer sides.

Honey Lime Grilled Chicken

We brined the chicken before throwing it on the grill which, honestly, makes all the difference. If you have the time and want to achieve grill master status, we definitely recommend brining the meat ahead of time. Simply combine water, salt, and sugar until the salt and sugar dissolve. Pour the mixture over chicken in resealable bags and refrigerate for 2 hours or even better, overnight. The meat will absorb the liquid, resulting in a juicier more flavourful chicken that is less likely to dry out on the grill.

Honey Lime Grilled Chicken

We brushed the chicken legs and thighs with a glaze made of honey, lime juice, soy sauce, vegetable oil, garlic, fresh ginger, crushed red pepper, and salt. It’s sweet, spicy, and tangy all at the same time.

Honey Lime Grilled Chicken

Serve it hot-of-the-grill with a squeeze of fresh lime juice and a sprinkle of cilantro at your next cookout. You can even use leftovers to make a filling for zucchini boats or to top salads with during the week. Winner winner grilled chicken dinner.

Honey Lime Grilled Chicken

Honey Lime Grilled Chicken
Votes: 0
Rating: 0
You:
Rate this recipe!
Print Recipe
Servings
8
Servings
8
Honey Lime Grilled Chicken
Votes: 0
Rating: 0
You:
Rate this recipe!
Print Recipe
Servings
8
Servings
8
Ingredients
Brine
Glaze
Servings:
Units:
Instructions
  1. Place chicken in gallon-size resealable plastic bags. In a large bowl, combine water, salt and sugar. Stir until salt and sugar are dissolved. Pour over chicken in bags. Remove air from bags to ensure that the chicken is submerged in the brine. Seal bags. Let brine in refrigerator at least 2 hours or overnight.
  2. Heat grill to sear or 450°F.
  3. In a medium bowl, combine glaze ingredients. Reserve half for serving with grilled chicken.
  4. Grill chicken, skin-side down, 10 minutes. Turn. Grill 10 minutes and turn again.
  5. Brush chicken with glaze. Grill 5 minutes. Turn again so skin-side ends up on top. Brush with glaze and grill until chicken reaches 165°F when tested with a meat thermometer.
  6. Serve chicken with reserved sauce. Sprinkle with cilantro.
Share this Recipe